May 25, 2026 • Callum Draper • 9 min reading time • Prices verified June 6, 2026
Temperature Control From Mash to Fermentation: The Inkbird, Plate Chiller, and Fermentation Jacket Decisions
Temperature control is the single variable that separates “pretty good homebrew” from beer that tastes like something you’d pay money for. At its most basic, this means two things: getting your hot wort (unfermented beer, straight off the boil at around 212°F) cooled down to a safe pitching temperature quickly, and then keeping that fermenting beer steady — often within a degree or two — for days or weeks while yeast does its work. Fumble either step and you’re inviting off-flavors that no dry-hop addition can fix. This guide walks through every piece of that thermal chain — from wort chillers to temperature controllers to fermentation jackets — and tells you which upgrade is actually worth the money at your current stage of the hobby.
One quick note on scope: this is a research synthesis, not a lab report. The assessments here are built from published specs, manufacturer documentation, and patterns across owner reviews — not from a personal test bench.
The Wort Chilling Decision: Immersion, Plate, or Counterflow
Before fermentation temperature control even enters the picture, you need to get roughly 5–10 gallons of boiling wort down to 65–72°F (for most ales) in a reasonable amount of time. How fast matters: every minute wort sits above 140°F is a window for Dimethyl Sulfide (DMS) — a cooked-corn off-flavor — to accumulate, and hot wort is a contamination risk once below the killing threshold.
Immersion chillers are the entry point. A copper or stainless coil drops into your kettle and cold tap water runs through it. Simple, easy to clean, hard to clog. The limitation is that tap water temperature sets your floor — in Texas in August, your ground water might be 78°F, which means you physically cannot chill below that temperature without adding ice to the water bath. Owners of basic 3/8” copper immersion chillers consistently report 30–45 minute chill times for a 5-gallon batch, depending on water temperature. Upgrading to a larger-diameter (1/2”) immersion coil or a whirlpool arm that creates convection noticeably shortens that window, per equipment reviews aggregated at morebeer.com/articles.
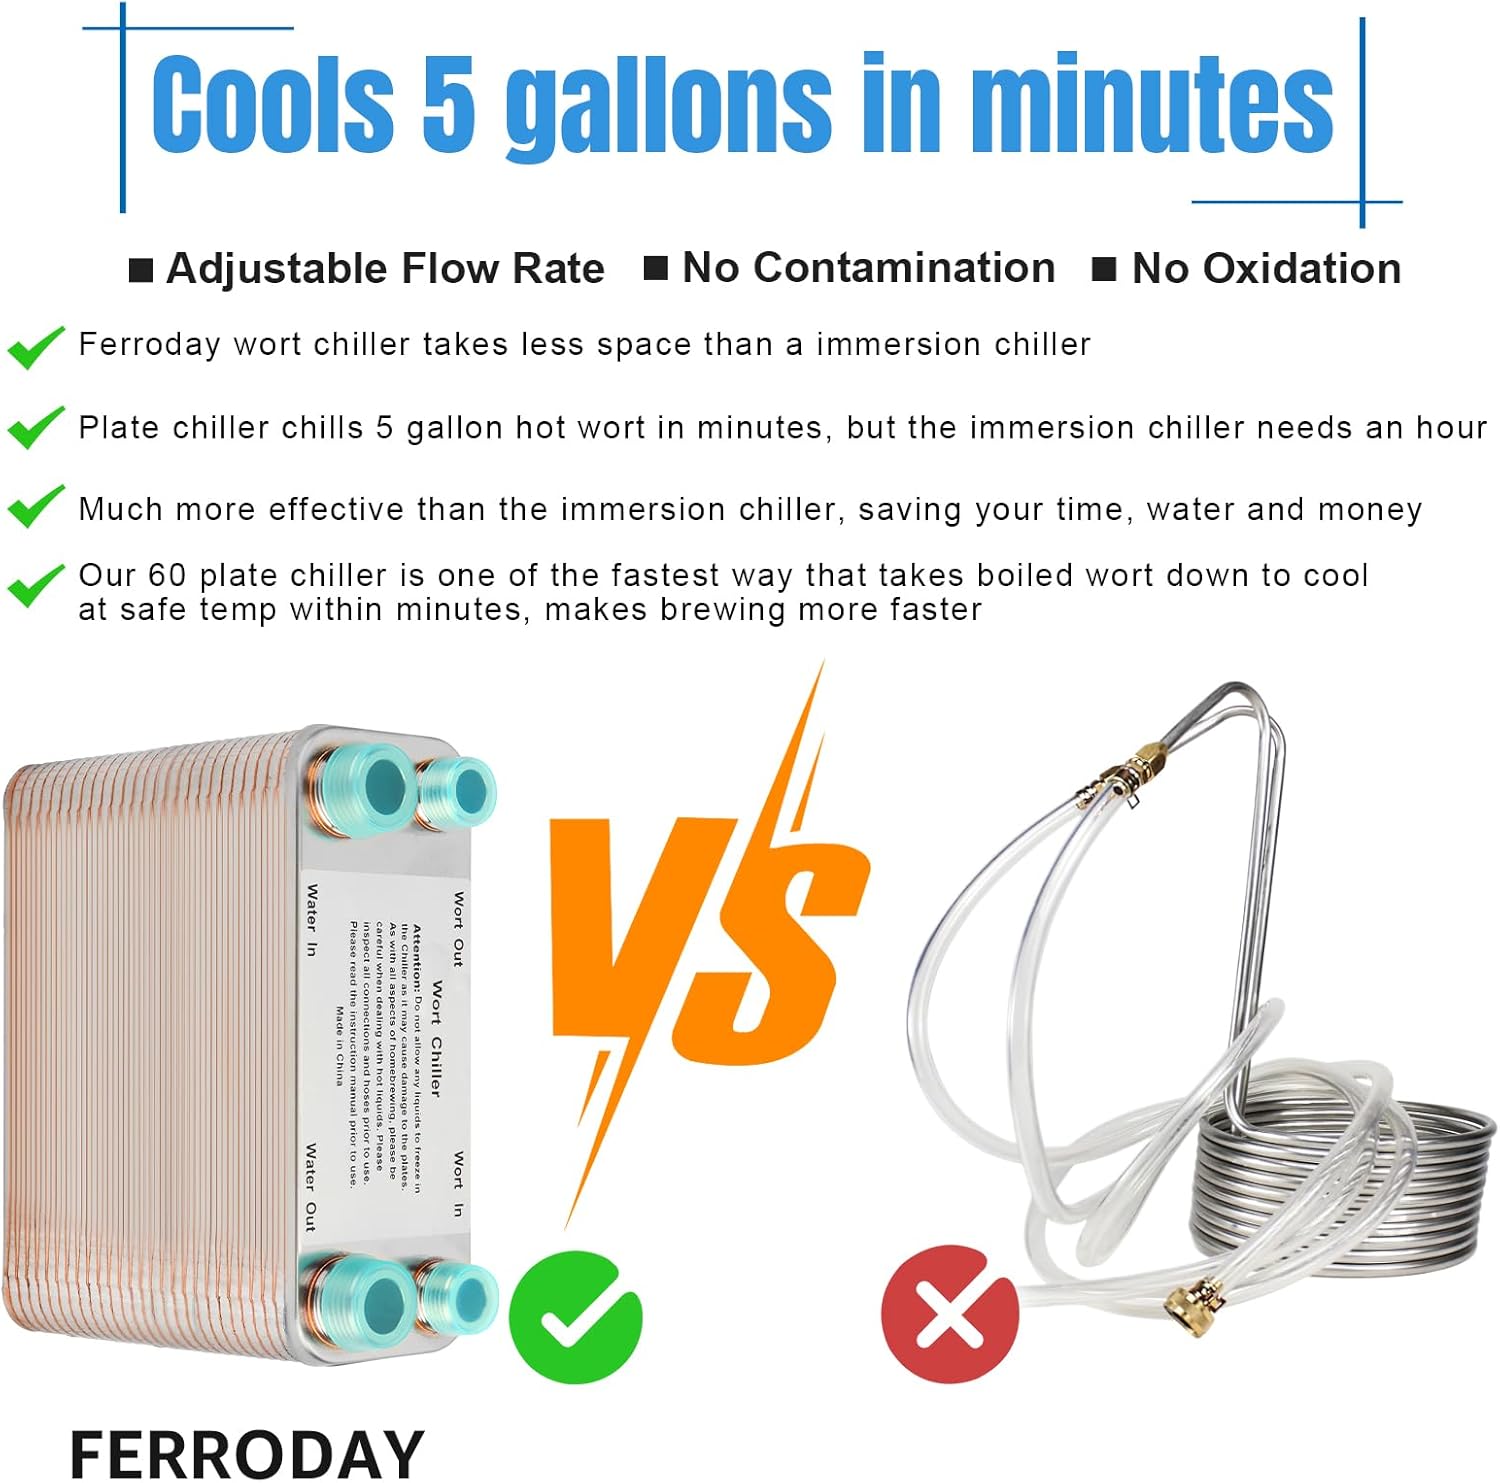
Plate chillers are where most intermediate brewers land on their second or third equipment upgrade. Wort flows through one set of channels while cold water flows the opposite direction through alternating channels — a counterflow design that can drop wort from boiling to pitching temperature in a single pass. Published specs on common 40-plate models like the Shirron or Duda Diesel put flow-through chill rates fast enough to match kettle output on a 10-gallon batch. The tradeoff owners consistently flag: plate chillers are notoriously difficult to clean. Every channel is a potential harbor for hop debris and hot break material. If you brew hop-forward IPAs with late-addition dry hops or whirlpool additions, a plate chiller without an upstream filter (typically a wire-mesh hop stopper) will clog — that’s not an edge case, it’s a pattern in long-run owner reviews across multiple platforms.
Counterflow chillers (CFCs) work on the same principle but use two concentric tubes instead of stacked plates. Easier to inspect, easier to flush, better resistance to clogging, and published specs show equivalent or better chilling performance per The Electric Brewery’s wort chilling methods documentation. The price delta over a plate chiller runs $40–$100 more at most retailers in 2026, and most experienced brewers who’ve owned both report not missing the plate chiller.
By the numbers — typical chill times for a 5-gallon batch:
| Method | Ground water 55°F | Ground water 70°F |
|---|---|---|
| 3/8” immersion coil | ~20 min | ~40 min |
| 1/2” immersion coil | ~15 min | ~28 min |
| 40-plate chiller | ~4–6 min pass-through | ~8–12 min pass-through |
| Counterflow chiller | ~4–6 min pass-through | ~8–10 min pass-through |
Times are aggregated from published spec sheets and owner-reported figures; actual results vary with water volume, flow rate, and ambient temperature.
Decision rule: If you brew under 5 gallons and your ground water is below 60°F, a quality 1/2” immersion chiller with a recirculating ice bath gets you most of the way there for under $80. If you’re at 10 gallons, brewing frequently, or in a warm-water region, a counterflow chiller is the cleaner long-term buy over a plate chiller — clog resistance alone justifies the price gap for hop-forward brewers.
Fermentation Temperature Control: The Inkbird Layer
Getting wort chilled is the acute problem. Keeping fermentation temperature stable for 5–14 days is the chronic one, and it’s where the most dramatic beer quality improvements show up in practice.
John Palmer’s How to Brew (4th Edition) devotes significant attention to the relationship between fermentation temperature and ester/fusel production — essentially, warmer fermentations produce more of both, and while some esters are desirable, fusel alcohols (the ones that cause headaches and hot, solvent-like finishes) are almost never welcome. The American Homebrewers Association’s fermentation temperature guide puts the practical rule simply: most ale yeasts perform cleanest at the lower end of their stated temperature range, especially in the first 72 hours when most ester and fusel character is set.
The Inkbird ITC-308 (and its dual-stage sibling, the ITC-308S) has become the near-universal entry point for fermentation temperature control, and for straightforward reasons: the spec sheet is honest, the price sits around $25–$35, and it integrates with any refrigerator or chest freezer via two outlets — one wired to a heating element (like a reptile heat mat or aquarium heater in a water bath), one to the cooling device. BYO Magazine’s fermentation temperature control feature identifies dual-stage controllers like the ITC-308 as the “minimum viable setup” for serious temperature management — the single-stage version that only controls cooling is a common early purchase mistake.
The workflow: set your target fermentation temperature and your hysteresis (the dead band — typically 1°F above and below your target before the controller kicks on), and the Inkbird handles the rest. Owners consistently report reliable performance over multi-year use, though calibration should be verified against a reference thermometer on setup, since unit-to-unit variance of 1–2°F is documented in aggregated reviews.
For the fermentation vessel itself, the controller’s value scales directly with how well-insulated your vessel is. A standard plastic bucket in a chest freezer with an Inkbird is a functional setup. A stainless conical (like the Anvil Bucket Fermenter or Ss Brewtech Chronical) retains temperature more consistently between controller cycles and gives you the thermal mass to handle brief ambient swings without overcooling.
Decision rule: If you’re fermenting in a room that varies more than 5°F day-to-night or season-to-season, a dual-stage Inkbird ITC-308 paired with a used chest freezer (~$80–$150 on the secondhand market as of mid-2026) is the single highest-return investment available in homebrewing. The Brulosophy exBEERiment series has documented statistically significant flavor differences from fermentation temperature variance as small as 4–5°F — this isn’t marginal.
Fermentation Jackets and Glycol: The Prosumer Tier
Once you’re running a dedicated stainless conical — an Ss Unitank, a Spike CF series, or similar — the Inkbird-and-freezer approach starts to create friction. You lose the ability to gravity-drain if the fermenter is inside a chest freezer, cleaning access gets awkward, and you’re committed to one vessel per freezer unit.
Fermentation jackets (also called temperature control jackets or heating/cooling wraps) are insulated sleeves that wrap directly around the fermenter body. They work with an external recirculating glycol chiller or a simpler cold-water chiller unit. The Ss Brewtech FTSs (Fermenter Temperature System small) is the most commonly cited option for the 7–14 gallon Chronical range — the system circulates temperature-controlled liquid through channels embedded in a silicone jacket and is controllable to within fractions of a degree. Published specs from Ss Brewtech rate it for both heating and cooling, which means you can do temperature ramps (raising fermentation temperature at the end to encourage yeast to clean up diacetyl, for example) without a second piece of equipment.
The cost entry point here shifts meaningfully: a glycol chiller capable of handling one or two fermenters runs $400–$800 from brands like MoreBeer’s house line or dedicated units from Spike. Add a fermentation jacket at $150–$250 per vessel, and you’re looking at $600–$1,100 to support a single-vessel glycol setup. The payoff is precision that genuinely matters for lagers (which require fermentation at 48–55°F and cold conditioning near 32°F), for hazy IPAs that benefit from strict early temperature control, and for any operation running two or more fermenters simultaneously without multiple chest freezers.
The Electric Brewery’s documentation on glycol systems notes that this tier also enables step fermentation profiles that are difficult or impossible to execute manually — ramping a saison from 68°F to 85°F over four days, or cold-crashing a lager from 50°F to 32°F over 72 hours, becomes a set-and-forget automation rather than a manual intervention.
Decision rule: If you own a single conical and brew ales, the Inkbird-freezer setup serves you well and the glycol investment is hard to justify unless the chest-freezer workflow is genuinely limiting you. If you brew lagers regularly, run two or more fermenters simultaneously, or are bridging toward a nano-scale operation where recipe consistency and documentation matter, the glycol-and-jacket system earns its cost. For the brewer running a Spike or Ss Brewtech 14-gallon conical as their primary fermenter and already frustrated by the chest-freezer workaround, the Ss Brewtech FTSs + a glycol chiller is the natural and well-reviewed next step.
Putting the Full Chain Together
Temperature control isn’t one decision — it’s three linked ones that build on each other. Wort chilling gets you to the fermentation start line cleanly. The Inkbird-and-freezer layer is where most serious ale brewers should live and where most of the return on investment sits. The glycol-and-jacket tier is a genuine quality-of-life and precision upgrade, not a vanity purchase, but it earns its price only when the constraints of the previous tier are actually biting you.
Per the American Homebrewers Association’s guidance on process consistency, the highest-leverage principle across all three decisions is the same: reduce the number of variables you’re managing manually. Every degree of temperature variance you automate away is a degree of creative attention you can redirect toward recipe development, water chemistry, or dry-hop timing — which is where most of the interesting work lives anyway.
Start where your actual friction is. Build the chain from the fermenter back toward the kettle, not the other way around.